Archive | January, 2010

The Big 4-Pattern Books and Envelopes

31 Jan

In Malaysia, we have dressmakers and tailors galore who charge very affordable prices to make garments. The tailor I used to go to charges RM20-40 for her labour-which in Aussie dollars is a mere AUD 7-15! If you want something made up, you go to a dressmaker down the road. In Australia however, dressmakers charge by the hour, and labour is expensive, so if you want something made, you have to fork out big time, or, buy a commercial pattern in your size, and sew it yourself.

Coming to Adelaide, I discovered the wonderful world of ready made commercial patterns. There are four main companies producing patterns-Vogue, Simplicity, McCall’s and Butterick-collectively called The Big 4. Fabric and haberdashery stores like Spotlight or Lincraft will have a browsing table with pattern books from the Big 4, as well as other smaller brands like Kwik Sew and Burda. You choose your pattern, your size, note the number and go to the counter and ask for your pattern. The store will have all of the  patterns in different sizes in stock filed in filing cabinets. They find that particular pattern number, fish out that pattern, and walla! It’s yours. Pattern prices range between AUD5-25, Vogue being the most expensive.

In Malaysia, commercial patterns aren’t available, and most people aren’t aware of them. Home sewers draft their own patterns using the oriental method, from which they make all their clothes. They start with a dress block of their measurements, which is a bodice and skirt block combined, from which they draft all other patterns. It’s a versatile method-no tissue fitting for every new garment design, and cheaper besides.

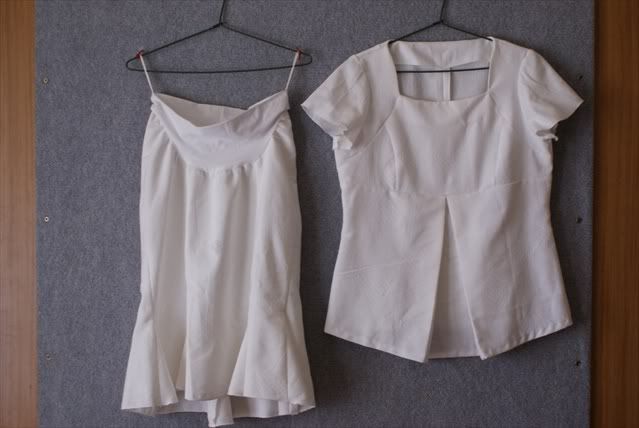
When I first came here, I never thought to pick up sewing. But since I was given the sewing machine, and Wyld Man said that I could have an overlocker, I tried my hand at sewing and garment construction and got hooked. However, I  remember my mom making her garments from her own dress block, which I didn’t have. So I bought some commercial patterns to try out. But for every different outfit that you want, you needed to purchase a different pattern, a habit that can get expensive,  and I’d rather spend my money on fabrics. I decided to learn to draft my own patterns instead, and bought Winifred Aldrich’s Metric Pattern Cutting for Womenswear as well as Dorothy Moore’s Pattern Drafting and Dressmaking book. However, I wanted still wanted some design inspiration-as those books had some rather outdated designs.

I used to walk into Spotlight and stayed an hour just to browse the pattern books. Those books were often at least an inch thick-with about 500-700 pages of designs. I loved looking at the design elements of each piece and studying the technical drawings. I was very happy to find that Lincraft sold out of season pattern books for only AUD5 each. I went and got as many as I could carry home-7!

McCalls, Butterick, Simplicty, Vogue and Burda

Some of them were Spring/Summer collections, the others were Winter/Autumn.

Cocktail dresses

Evening dresses

Jeans patterns

Jackets and blazers

Most pages had a textbox with information pertaining to sizes and yardage required for a particular design.

Winter coats

Some maternity designs

More evening dresses

Children's patterns

Even costumes

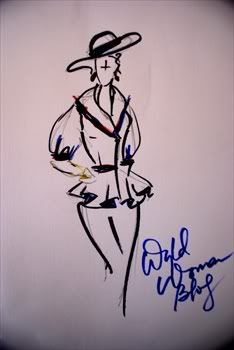
Except for the evening dresses, most of the tops, skirts, pants and dresses I can draft with the help of my pattern drafting books-so I won’t need to buy more commercial patterns. However, I do keep a lookout for difficult patterns or patterns for evening gowns in opshops. This is one which I picked up for a dollar.

STYLE evening gown pattern

For the benefit of those back in Malaysia, I will proceed to explain what is in a commercial pattern.

Patterns come in a paper envelope with the photo or illustration of the design in front, and sizing and yardage requirements on the back.

Sizing, finished measurements, required yardage and notions.

Some patterns come with multiple design variations, and each design is called View A, View B, View C etc.

Inside the envelope, you get a design sheet, and an instruction sheet.

Instruction sheet

The instruction sheet gives an overview of pattern pieces you need to cut, sewing instructions and construction sequence.

Pattern sheet

The pattern sheet is a huge piece of tissue paper with pattern pieces printed on it which you cut out. Seam allowances are usually included, as well as darts placements and markings which you transfer to your fabric.

Instructions on pattern pieces

Each pattern piece is numbered, with instructions for cutting the number of pieces.

Most patterns nowadays are multisized, meaning that you have to choose a size for yourself out of a range of sizes printed on the pattern paper.

Although I was very excited when I first came and discovered commercial patterns, I’ve quickly found that not all the sizing is accurate-the bust may be too big, the length too long, the sleeves may be too large-which can only be resolved with making a test garment and tissue fitting. Aside from that, I’ve mentioned earlier that it can be an expensive habit if you want a range of designs for your garments.

But having learnt how to draft patterns and having thos 7 humongous pattern books, I have the best of both worlds. I have technical drawings to base my drafts on, my garments made on my personal block fits me perfectly, and I don’t have to pay everytime I need a new design.

Baby Sling Tutorial

31 Jan

I’ve been looking online at baby slings, and I’ve decided that they would come in very handy for carrying baby around with me and keeping my hands free. However, commercial baby carriers cost upwards of AUD60-and I’ve seen some really nice handmade ones for about AUD40 too-also more than I’ve willing to spend for something which I can make myself. So I made one this arvo (Aussie slang for ‘afternoon’) out of a red cotton print given to me from that nice church lady this morning. I had thought to make one with adjustable straps, but I wanted something quick today, so I only made a fitted sling, non-adjustable, and to my measurements. So Wyld Man probably won’t be able to use it.

The red fabric that I had was of a 45 inch width, which was perfect folded in half for the project, since you’d need the sling to be reversible and double sided. In total, I used about 1.5 metres of fabric.

Red cotton print

First, I loop a measuring tape over one shoulder and under the opposite arm loosely, maybe adding about 3-4 inches of wearing ease into that measurement.  Imagine that the tape measure is a sling, and decide how loose or tight you want it to be.  Mine came to 47 inches in length.

I drew a pattern on the newspaper.

It looks like a misshapen kite.

On the left end is a gentle curve-that’s where you want the baby’s bum to sit. The width of the widest end is 45 inches divided by two-just fold your 45-inch fabric lengthwise.  On the right is the strap that will go over your shoulder-that straight line is cut on a fold-and can be any width-I made mine about 7-8 inches wide. And the length of the pattern is that measurement over the shoulder and under the arm divided in half-mine was 47 x 1/2 inches=23.5 inches.

I added a seam allowance of about 5/8 inch all around the pattern except for the shortest line on the right-that line is cut on the fold.

My pattern all cut out with seam allowances

I pressed the fabric before cutting

I folded the fabric lengthwise once, and then again in half crosswise, so that I had 4 layers of fabric. I laid the pattern onto the fabric, with the “CUT ON FOLD” line placed directly on the fold of the cloth.

Pinning my fabric onto the pattern before cutting out

And then my scissors came out. Snip snip.

The fabric all cut out

Here, I have 2 pieces of fabric folded on the left end, and with curved raw edges on the right end. Time to sew!

I separate the 2 pieces of fabric, put them right sides together, and pin all alongside the long edge.

Right sides together and pin

I sew a seam down the 2 long edges of the sling, but not the curved edges.

This is because we want to turn it inside out later.

Here, I’m pressing the seams flat and open

I turn the sling inside out, and press the outside edges flat

Time to sew the curved edges together.

Here, I pin fold the sling, and bring to two curved edges together and pin

Sew a seam down the curved edge.

Press the curved seam open with a folded towel underneath.

I find that a folded thick towel is an excellent substitute for a tailor’s ham.

Just put your fist under the towel to form a curved surface to iron a curved seam, like a princess seam

Enclose the first curved seam with another seam from the opposite side.

Stitch the standing seam down to one side.

This is called a flat-felled seam, whereby a seam is sewn on one side, then turned over, with another seam sewn on the opposite side to enclose the first seam, and then the standing seam is stitched to one side. This forms a very strong seam.

The finished baby sling

A one-hour project.

That’s the rhino-in-a-nappy in the sling. Front view.

Back view

Edited on 1/12/2014: I’ve published maternity and nursing patterns on Craftsy! Be sure to check them out!

New Fabric For My Stash!

31 Jan

Yay! The lady at church lived up to her word and gave me another stack of fabric to bring home and play with. And I have already done something with it today-see my later post.

New fabrics to add to my stash

Again, she emphasised that they were all natural fibers-wools, linens and cottons-nothing synthetic-well, except for some Bemberg linings. They are more than 20 years old, but are in amazingly good condition.

A really pretty purple and silver Bemberg lining

Some sort of grey and brown tweed

A really pretty white Swiss cotton fabric with raised dots and lines

A light blue houndstooth wool

Blue linen

A dusty rose pink polished cotton

A beautiful light wool

But I have no idea what to make with this. I’m not sure it’s a colour that would suit me. The only thing I could come up with was to make a light blanket! Surely that’s a little sacrilegious?

A light tan-coloured thick cotton twilled material.

I think it would make a beautiful winter skirt-gored of course. Maybe a matching jacket?

A white cotton with jacquard weave

Would make a lovely white suit.

More linens.

A heavy cotton plaid

A purple linen

And the lady threw in a jewellery travel bag.

Handmade in white satin.

A view from the front and back of it

Zippered compartments for necklaces and bracelets

And that tube thing has a snap at the end which you unclasp and you can string rings unto it!

I love all the fabrics I got today. It almost filled up a 55-litre plastic storage box I just got last week! Now I have 4 of those boxes all filled up with fabric!

Baby Rocker Makeover

30 Jan

Somebody at my mother-in-law’s workplace gave her an old baby rocker to give to me. I liked that you could put a baby in there and rock it to sleep, as well as set it up so that it stays stationary. However, this is what it looked like-

It looked rather old and stained.

The fabric was sewn into the frame of the rocker, so couldn’t be taken out and washed.

I wasn't crazy about the dirty teddy bears

But it was a good brand-Mother’s Choice, and a freebie is a freebie. So I decided to give it a facelift.

I had some really soft cotton that I picked up at the opshop that I decide would look really good as a cover.

Some blue cotton fabric from the op shop

I also went to Spotlight today and picked up a metre of prepacked polyester wadding.

Polyester Wadding

But before I did anything, I wanted to make sure that the fabric would look right on the rocker.

A mock up of what the final product will look like.

Looks just fine. So, I proceeded to make a pattern with newspaper.

Using newspaper to make a pattern.

Marking all the spots on the newspaper

Cutting out the fabric with the newspaper as a guide and adding seam allowances.

Laying the wadding on newspaper.

Cutting the wadding without seam allowances

Pressing the fabric flat to prevent puckers when sewing.

I planned to sew the wadding onto the wrong side of the fabric, and then turning it inside out. So-I pinned the fabric rights sides together, with the wadding on top of the wrong side.

Pinning the wadding on the wrong side of the fabric

I sewed directly onto the wadding all around the sides.

However, I left a hole in one of the short sides for turning the cover inside out.

The Hole

I anchored the four ends of the wadding unto the fabric before turning inside out

Then I proceed to pull the fabric and wadding through the hole.

This is what it looks like the right way up. See that little hole?

I’m going to close it up with iron-on hemming tape.

Inserting hemming tape into the hole

Iron-on hemming tape is a fusible adhesive which bonds 2 pieces of fabric together when heat is applied. It is usually used for making invisible hems. I only discovered it in Adelaide-I’m not sure if I’ve come across it in Malaysia.

Ironing the hole with the fusible hemming tape in it.

The original rocker seat has a strap sewn unto it to hold the baby in. I wanted to transfer it to the new cover. So I cut it off. Snip snip.

Cutting off the safety strap

I wanted the cover to have a quilted look, so…

Here I transfer all the markings from the newspaper to the cover.

I sewed along those markings to define the seat of the cover

I sewed a curvy line down the length of the cover

Here I used the quilting bar to guide the second line of stitching

The quilted look

Sewing the safety strap on with a bartack stith

I handsewed snaps on black tape on all four corners to anchor the cover into position.

Tadaa!

I also made a little padded holder for the straps.

This was a very quick and rewarding project-no precision needed, yet the finished product looked quite professional.

Here’s a before and after picture.

BIG improvement!

Laksa Chook Stirfry

29 Jan

When I first came to Adelaide, Wyld Man educated me on some Aussie slang. A barbeque is a barbie, kangaroo is shortened to roo, afternoon gets referred to as arvo,  a biscuit is a bickie, MacDonald’s is makkas and a chook is a chicken.  Other interesting slang I picked up are such as a pom or a pommie, which is a reference to a British person; being peckish means being hungry; football is footy-but means Australian Rules  football, not football as Malaysians know it, which is known to Aussies as soccer; and an ocker or yobbo is a somewhat uncultured Aussie male.

Wyld Man sometimes laughs at my take on Aussie slang, which still sounds like a Malaysian trying to talk Aussie, but I’ve starting calling chickens chooks. So this dish is a Laksa Chook Stirfry which I knocked up last night on the fly. It’s a simple dish, with ingredients which can be sustituted quite easily with pretty much anything. I used laksa paste from a jar-it’s so easy and tastes just yummy.

Before I proceed however, I should say that there are many types of Malaysian laksas as there are states in Malaysia. There’s Sarawak Laksa, Johor Laksa, Penang Laksa, laksas with curry, laksas with coconut milk and without, laksas with speghetti noodles instead of the usual laksa noodles, assam laksas, and Singapore laksas. I love all kinds of laksas, loving each one I tried more than the last, although my favourite has to be Johor laksa and Penang Laksa, Johor laksa being a standalone unique dish made with fish mince sauce and speghetti and eaten dry instead of soupy. The laksas I encounter in Adelaide are more geared towards curry laksas or Singapore laksas. However, the jar of laksa that I had in my pantry was probably to make an assam laksa.

The Ingredients

2 chook filets, carrots, curry leaves, celery, garlic shoots, laksa paste, constarch, oil, sugar, salt and pepper.

Thai Tonight Laksa Paste

This is the brand I had in my pantry-and these were the instructions on the jar…

Instructions for laksa soup recipe

I wasn’t in the mood for soup or noodles. So out went the instructions!

Any laksa paste should do.

First, cut the garlic shoots in 1 inch lengths

Peel the carrots and slice thinly

Wash and cut the celery

I like my celery cubed. So chop off the ends.

Cut the stems at where they divide and look out for dirt.

Cut each stem lengthwise twice.

Slice up the stems

Now cube the chook.

Cut the breast filets lengthwise about 1 cm wide

Turn the lengthwise slices 90 degrees and slice in 1cm widths to make cubes.

Heat oil in the pan on high.

While it is heating up…

Coat the chook with 2 heaping tablespoons cornflour

Season with salt and pepper

Stir the mixture and coat the chook evenly

This removes any excess moisture from the chook, reducing splatter when you put it into hot oil, and also makes them brown nicely. The cornflour also helps thicken the sauce.

Put the chook into the hot oil and break it up so that all the chook gets contact with the bottom of the pan.

When the chook has lightly browned, push to one side of the pan

Add 2 heaping tablespoons of laksa paste

Add the curry leaves

Stir and coat the chook thoroughly with the paste.

Add the garlic shoots

Add the carrots

Add the celery

Add a cup of water and cover

Bring to a boil, and lower the heat and let simmer for 10 minutes or till the carrots are soft.

Sprinkle in a tablespoon of sugar. I use brown.

And it's ready!

Serve hot with rice

Makes 8-10 servings.

Laksa Chook Stirfry

Ingredients

2 Chicken Breast Filets-cubed

1 bunch of garlic shoots-cut into 1 inch lengths

5 celery stalks-diced

2 medium carrots-sliced

2 heaping tablespoons Laksa paste

1 cup of water

2 tablespooons cornstarch

Salt

Sugar

Oil

Pepper

Method

Mix chicken cubes with cornstarch, salt and pepper.

Heat oil, add the chicken and brown. Push to one side, add laksa paste and curry leaves.

Coat chicken with the paste. Add carrots, celery and garlic shoots. Stir.

Add a cup of water and bring to boil. Simmer for 10-15 minutes till carrots are soft.

Add a spoonful of sugar.

Serve hot.

Makes 8-10 servings.

Chinese Style Rice Vermicelli (Meehoon)

28 Jan

In the first 3 months of my pregnancy, I had a craving for noodles. Fat noodles, short, thin, long, wet and dry-I wanted it all, and that was all that I wanted. I’ve never cooked meehoon before then, but decided to try my hand at  making up my own version of meehoon. Wyld Man likes it, and so did a friend who came to dinner once. And it’s been a regular feature at the Wyld dinner table. Here’s a step-by-step photo guide to making your own.

Ingredients

Minced pork, Carrots, Silverbeet, half a red onion, rice vermicelli, light soy sauce, dark soy sauce, honey soy sauce, eggs, sugar and salt  (not shown). Also not shown is oyster sauce-I forgot about it coz it wasn’t in my fridge!

The brand of rice vermicelli that I use. Here I used the empty packaging to hold peeled carrot skin.

Soak one packet of rice vermicelli in hot water till soft.

Drain

Add the honey soy sauce-I used Kikkoman brand. Or substitute with chilli sauce. Or you can do without too.

I use a very generous drizzle-1/3 cup

Light soy sauce

Another generous drizzle. 1/3 cup

Dark Soy Sauce

1/3 cup

Oyster Sauce

2 big tablespoons

Stir together. At this point, taste it and add whatever sauce you think it's missing.

Grate 2 medium carrots roughly.

Wash and drain silverbeet and chop off the ends.

You can susbstitute with celery, spinach or any leafty vegie.

Slice the silverbeet into strands.

Peel off the skin from the red onion.

Dice

Break 3 eggs.

Break the yolks and stir.

Heat your wok/pot on high. Add oil when hot.

I would normally use a wok for this-but I have an electric stove top, and a wok which is not completely flat-bottomed-which means that energy gets wasted and is not conducted to the steel. My pot works just fine for this though.

Heat a non-stick pan and add oil.

Add the red onions to the big pot.

Pour in the eggs into the non-stick pan.

I do these two steps at the same time to save time.

While the eggs cook....

wait for the onions to become translucent.

When the eggs have fully coagulated and set, break into small bits.

A restaurant would roll the eggs and slive them thinly, but they taste the same either way. My way saves time and saves washing an oily cutting board.

Put in the pork mince.

Make sure to break the mince up and cook till it is no longer pink.

Can be substituted with chicken cubes.

Add the grated carrots.

Add the silverbeet.

Stir thoroughly and taste. I decided that mine needed a boost.

Out came the oyster sauce. 3 tablespoons.

And I added a tiny bit of sugar too. 1 tablespoon.

Add the rice vermicelli.

Stir with 2 forks to avoid breaking up the vermicelli strands. Taste.

Add the fried egg bits.

Stir around and you’re done!

Serve hot and garnish with some parsley.

And I like mine with some chilli sauce. Yum!

Chinese Style Meehoon

Ingredients

Half a red onion-diced

1 packet of rice vermicelli (rice sticks), soaked till soft in hot water.

2 medium carrots-grated

5 stalks of silverbeet-sliced

3 eggs- beaten

400 g pork mince

1 tablespoon sugar

4 tablespoons oil

Seasonings for Rice Vermicelli

1/3 cup soy sauce

1/3 cup dark soy sauce

1/3 honey soy sauce

1/3 cup oyster sauce

Method

Pour in the seasonings for rice vermicelli and mix thoroughly. Set aside.

Heat wok on high. Add oil and fry the red onions till translucent.

Heat nonstick fry pan with a little oil, and pour in the beaten eggs. Cook and turn over till set, break eggs up and set aside.

Add the pork mince into the wok and break mince up. Add a sprinkle of salt. When mince is no longer pink, add carrots and silverbeet and stir.

When vegetables are soft and cooked, add the rice vermicelli and the eggs. Stir thoroughly.

Taste and season with sugar and oyster sauce.

Serve hot.

Makes 5-6 servings.

I Have a Plan for a Maternity Top Part 2

28 Jan

Read Part 1 here.

I've cut out my material using my pattern and laid them out.

Here I've used tailor's tacks to mark all the important points.

I’ve only recently discovered tailor’s tacks-and I loved them! (For those new to sewing, tailor’s tacks is a method of marking fabric using double unknotted thread, which is pushed through and back again through the fabric at a marking point, leaving a loop and a tail at opposite sides of the fabric. You then separate the fabric layers which have been tacked, and gently cut the tacking thread in between the fabric layers. This leaves a tail of thread on two or more layers of fabric, at the exact same spot.) I’ve read about them before, but was too lazy to implement it-however, I’ve tried it with my last two projects, taking pains to mark all the points where seams are supposed to join, the centre mark of a pattern, the darts, points where the facing is supposed to join the main garment pieces etc-and I’ve discovered that the time you save not fiddling around in the middle of your sewing time looking for that centre mark or wondering whether the seamlines join exactly on that spot or not is very significant. I just about whizzed through the making of that top because all the points where tacked and I knew immediately where to join it to.

At this point, I serged all the edges of the garment pieces except for the armhole, and sewed the dart on the back and front pieces. I normally make it a point to join all the pieces that make up the whoe front panel, before I do the back panel, leaving out the sleeves. And only then do I join the front panel to the back panel.

Here, I am joining the front belt piece to the front top piece, matching tailor’s tacks.

Joining tailor tack on the front belt piece to the tailor tack on the front top piece

This is what the front top looks like.

Next, I prepare to make gathers on the bottom front panel piece.

Running a long tacking stitch along the bottom front panel for gathering.

Making my gathers.

I wanted the gathers to start and stop between the two dart lines, and had marked the spots where they start with tailor’s tacks to make it easier. You can see above that the gathers are only at the tummy area, and not on the sides.

Joining the bottom gathered panel to the top.

This is what it looks like on the back.

Next came the denim neckband. This was a little challenging. Again, thanks to the work I put in with the tailor’s tacks, doing this became so much easier because I could match the dots on the yellow fabric to the denim without much trouble. I had to clip and notch the inner square corners in the neckline of the yellow fabric to ease in the denim band onto it.

Joining the neck band to the front panel.

Thats all the front panel done. Now I went on to do the back panel.

This is what the back panels look like.

I cut the back panels with a centre back seam, but with a one-piece neckline, planning to put in a zipper at the lower half of the back.

The zipper I planned to use was an invisible zipper I picked up for 50cents from an op shop. I didn’t realize that it was made by YKK, the same company that supplies zippers to Coach-the best.

YKK zipper

I’ve inserted invisble zippers before-but never successfully, because I didn’t realize till later that I needed an invisible zipper foot. So I went and got one last weekend.

My new invisible zipper foot.

I sewed the centre back seam with a regulation stitch length till about 1/3 the length of the back,  and used a long running stitch for the rest of the seam. I pressed that seam open to in order to establish the seam line folds. I removed that running stich, and then pin-basted my zipper onto the the folds of the seamline.

Inserting an invisible zip

I sewed the zipper in with my invisble foot, and was very impressed with the way the zipper just disappeared into the seam. However, after all that work, I realised later that the top was roomy enough to pull my head through without a zipper, so I ripped it out for another project, and just sewing the back centre seam shut.

Next, I joined the back neckband to the centre panel-again, matching the tailor tacks.

Joining the back neckband to the back panel.

Here, I joined the front and back panel pieces at the shoulder seams.

The front and back panel pieces joined at the shoulder seams.

The  next step was to prepare the facings. I joined the front and back neck facings, matching the tacks.

Joining the front and back neck facing

Right sides together, joining the facings to the main garment pieces at the neckline.

Because there were two layers of denim, the neckline was very bulky. I proceeded to grade the seam allowances within the neckline. Grading is a technique of trimming down a seam allowance to a smaller width in order to reduce bulk, especially in facings and collars. I’ve also clipped and notched the inner square corners of the denim neckband to release the excess fabric. This allows it to be turned right side out without bunching up.

Grading the seam allowances. Here you can see the smaller width of the seam allowance which has been trimmed/graded down.

So help the neckline seam allowance to stay under the facing neatly, instead of rolling over, I understitched the facing to the seam allowance.

Understitching the neckline facing to the seam allowance below.

However, neckline facings have a way of misbehaving, in that they are prone to turning up on the right side of the garment instead of staying down. In order to anchor it, I used a stitch-in-the-ditch technique on the neckband-meaning to sew in between seamlines of two pieces of fabric stretched in opposite directions.

Stitching in the ditch. Here, I'm stitchin in between the seam lines of the neckband, catching the facing underneath. This anchors the facing into position.

That’s the front and back panels joined and done. Now for the sleeves.

My sleeve pieces.

Note the tacks on the sleeve cap-2 tacks means the back of the sleeve, 1 tack means the front of the sleeve. It is very important never to mix the two up-or you’ll get a sleeve that doesn’t sit properly, or doesn’t give you enough movement. Also, I’ve tacked spots on the denim cuffs where I’ll insert pleats into the yellow fabric.

Making pleats in my sleeve.

I joined the yellow cotton and the denim rights sides together, and turned the denim cuff under and sewed it together.

Tadaa!!

My two finished sleeves. They look like best friends!

I showed them to the Wyld Man-he thought they were mini caps!

The typical sleeve cap is always 1-2cm longer than the length of the armhole. This is to allow room for the outward curve of the shoulder. However, in order to join the sleeve to the armhole, that 1-2 cm excess fabric has to be EASED into the armhole WITHOUT puckers.  To do that, I make a long running stitch inside the seam allowance of the sleeve cap (between the 2 tailor tacks), and make a slight gather.

Ease stitching the sleeve cap.

Then, right sides together,  I pin baste the sleeve to the armhole.

Pin basting the sleeve to the armhole. The more pins, the better, the less puckers.

Always sew onto the sleeve side, not on the side of the main garment. Although the position of the needle on the main garment is easier, you are more prone to getting puckers if the sleeve is downmost layer on the needle plate.

I do this for both sleeves, and that finishes the garment. Except for the hem.

For the hem, I use my newly discovered adjustable blind hem foot which had lived in my Janome MyStyle 20 all this time, but had never mad an appearance because I only figured out last weekend what it was for!

Adjustable Blind Hem Foot

I love this little foot! It’s a lot better than the regular blind hem foot which has a set width for blind hems. This one however has a screw which adjusts to whatever width you want, making it perfect for topstitching, or close-precision-edgestithing. And I did one of the best blind hems I’ve ever done with this little foot.

And with that done, and with my top pressed, this is what it looks like now.

Front

Back

My maternity outfit!

The Wyld 2009 Maternity Collection

24 Jan

When I started sewing in October 2009, I was 5 months pregnant. And I had just bought my overlocker. It was coming to warm weather and I had nothing to wear to suit my expanding belly-not that I showed much then. I was bored and looking for a hobby to occupy my time. I discovered  that Spotlight was just a 10 minute walk away and haunted it a few times a week, building up a stash of fabric from the bargain table. And I sewed and sewed. I was went crazy sewing up maternity dresses-being disappointed with the offerings in retail stores. I made mostly dresses with empire waistlines and an inverted pleat in the front to accommodate a growing baby bump. And then I made maternity skirts with stretch panels.

I present to you the Wyld Spring/Summer Maternity Collection 2009.

White marine weave cotton drill dress with gold buttons and inverted pleat.

This was my first attempt at making a dress. I had NEVER sewn a dress before. Never taken classes, only watched my mum sew her wardrobe for the first 15 years of my life. I had no pattern, but wanted a princess seamed dress with an inverted pleat under the empire waistline. I used an old denim princess seam dress and traced the seamlines to get my pattern- I was doubtful at first whether I got it right, having NEVER done it before, but I did a muslin (test garment) and miraculously-it fit! It was also my first attempt at making buttonholes, and I was quite nervous, measuring everything twice and practicing on scraps before I dared but the buttonhole presser foot down on my material. It turned out pretty all right, don’t you think? The lines are slimming, and I can wear it for after the baby comes and nurse in it.

Navy polka dot dress

This was my second attempt at a dress. I love polka dots and just had to have this material-even though it was selling retail. (I generally never buy fabric at retail prices). I used the New Look 6751 Misses Dress size 12 pattern for the top, and modified the waist, adding about 10 inches of material in the inverted pleat.

New Look 6751

I made it sleeveless, not being confident enough then to insert set-in sleeves.The white band in the neckline, waist and pleat are the leftovers from my white sleeveless dress above. I used an invisible zipper at the back, but had to rip it out three times because the waistline seam did not match at the back. AND, I used a regular zipper foot, so I’m still not satisfied with the zipper.

This modified pattern became one of my favourite patterns for materntiy. I love the fit and the style, and I made my third dress with this geogeous pink floral gerogette in the same pattern.

Pink Floral Georgette Maternity Dress

It’s one of my favourite dresses, and this time, I tried setting in the sleeves. Very happy with the result. And I learnt from my blue polka dot dress to match the waistline seams at the back before inserting my zipper. I still need to get an invisible zipper foot though.

Red Heavy-weight georgette suiting dress.

This was the fourth dress I made. I loved the fit and style of my first dress, and decided to make another in the exact same pattern. I loved the red material, but was a bit careless about putting in my button placements. I only learned later that buttons should be places on the bustline to prevent gaping-this one gapes because I didn’t know of that rule, and it had fewer buttons than my white dress.

Plaid Maternity Dress

This plaid dress was another step up the learning curve-learning how to match plaids. It took me more than an hour just to figure out how to cut the material so that the plaids match at the seams. I cut it in single thicknesses and double checked the position of the plaids at the seamlines, not at the cutting lines.  And it was worth the time and effort because all my plaid lines match! Wyld Man likes it, although he thought it looked a bit like a school uniform. The white neckband and waistband are again leftovers from the white marine weave cotton drill from my first white dress.

Green and blue rayon polyester maternity dress

I made this dress on the fly and rather in a hurry, but it’s again one of my favourites. Wyld Man thought the colours of the dress a bit hippy, but then grew to really like it. It elicits quite a few compliments whenever I wear it. I wear it with a strip of velvet ribbon with an overlocked rolled hem. The fir of the pattern is loosely based on the New Look 6751 from above, but with none of the detailing. I decided that the fabric looked busy enough without any more detail added to it.

I made all the above dresses within a span of 3 weeks-and then realised that I needed separates for mixing and matching with my existing wardrobe. I decided to make a skirt and a top. At this point in time, I had bought a pattern drafting book called Metric Pattern Cutting for Womens Wear by Winifred Aldrich and drafted my own bodice and skirt block in size 12. I decided to make a 7 panel, slightly flared skirt in white, again in the white marine weave cotton drill. For the top, I made a simple loose top with double sleeves in the leftover floral pink georgette, and lined it.

My pink georgette top with double sleeves and white panel skirt.

I drafted and designed the skirt with a round maternity panel at the waist in stretch t-shirt knit for the baby bump. However, I made the hips a tiny bit too small, and I outgrew it a few weeks later. A bit sad about that-but I will be able to wear it again soon-I hope!

By the way, I bought that hat in an op shop. Love it!

Flounced, 7 panel maternity skirt in upholstery material

I bought the material for this skirt at an op shop. It’s meant to be made into curtains, but I thought it would be lovely as a skirt-being a heavy weight fabric with a lovely sheen and body. This pattern was self drafted and designed, and I also cut a length of ribbon from that material to use as an embellishment for a top. That top by the way is also an opshop find-a lovely broderie anglaise smock from Salvos at Goodwood Road.

Pink Luxe Satin Top with double sleeves

I made this top from a 1 metre remnant from Spotlight. I like it, but being a bit flashy haven’t worn it out yet.

Denim maternity flounced skirt

This denim maternity skirt is my all time favourite item to wear with practically any top. The denim is quite substantial, and holds the shape well. I love the way the flounce swings around my legs as I walk. Despite the fact that it is denim, it looks tailored enough to wear to church and goes with more formal tops as well. It is in the same design as the brown skirt above, but a bit looser since I made this for late pregnancy wear. However, I should think that I’d be able to wear it post pregnancy since the stretch maternity panel should be able to hold it up on a flat belly.

Except for the pink satin top, I’ve worn everything multiple times, and have always gotten lots of compliments-a great incentive to sew more!

So there you have it, my maternity collection fro 2009. Stay tuned for more!

An Ever Increasing Fabric Stash

24 Jan

Is a good thing. Despite the increasing lack of storage space. A lovely lady at church today who used to sew but doesn’t anymore gave me a huge stash of fabrics to take home and play with.

Fabric Stash on my kitchen table

The fabrics were really good quality, made of natural fibers and in wonderful conditon, despite the fact that some of them were over 20 years old. Some of the stars of the day were:

Silk with matching woven trim

This would make a wonderful ethnic looking skirt and top. Maybe a sari? Although I wouldn’t know where to wear one in Adelaide.

Genuine Thai Silk with a certificate of authenticity

Thai Certificate of Authenticity

A huge yardage of a soft blue waffle weave cotton/silk blend

A different shade of the same cloth above in a reddish pink.

Light pink silk

White Linen

Pink material with woven checks-not sure what kind of material it is though.

Champagne coloured soft linen

A white pinwale cord-like material. It also came in light and dark blue.

I’m thinking a white gored maternity skirt for this one.

Light brown linen

Today’s catch inspired me to sort out my fabric stash into some sort of order.

My fabric stash and storage place

This is what it looked like before. I’ve filled up 3 55-litre storage boxes, and fabric stilled overflowed.  I spent more than an hour sitting down on the floor folding fabric into uniform lengths to fit the boxes.

Folding folding folding

I folded and positioned all my fabric so that it was sitting vertically.

Makes it easier to see and pull out a particular fabric that I want.

My fleec stash for making cloth nappies.

Fashion fabric.

Fashion fabric

At least one third of the material you see were given by other people. Another third from opshops, and one third from Spotlight. I can’t help collecting fabric-it’s so addictive! I need to sew more!

I should have catalogued the fabric and measured it though. But my back was aching from sitting on the floor too long.

Anyways, the fabric were collected over just 3 months-I wonder how much I’ll have in a year?! The church lady said she’ll bring more next week-can’t wait!

Sewing Lessons and Gestational Diabetes.

20 Jan

Had my sewing student over today.

My diligent student hard at work. Isn't she sweet?

This is her third lesson and we’ve been making an apron. I helped her draft an apron that she saw online and wanted to make.

Funky Apron Top

I thought it was rather similar to mine in the front.

My apron from leftover curtain material.

Anyways, we’ve been cutting and marking the pattern for the apron the last lesson, and only got to sewing today. However, the straps were a nuisance to make and iron, so that ate a lot of time and she was only able to sew the bra top this morning.  But I’m hopeful that she can finish the apron in the next lesson. This is what my dining room table looked like after we finished cutting and marking the apron fabric.

Necessary sewing messes.

I still have the baloons up from the baby shower.

Anyways,  I noticed that for the past 2 days  including today, I’ve been feeling excessively thirsty. Carol was concerned that it was gestational diabetes, especially since she remembered that my feet were swollen a few days ago, and still does a little now. And I was complaining of feeling drained and fatigued all day yesterday.So I called up the Women’s and Childrens midwife and they told me to come in for some tests.  I got Grandma and Grandpa to drive me there. Good thing I went of that hospital tour on Monday, because I knew exactly where to go today.

They checked my vital signs and my glucose and blood pressure tests came back normal. They got me hooked up to a monitor for fetal heartbeats and uterine contractions for 45 minutes and that came back normal as well. However they couldn’t figure out why I had this unquenching thirst no matter how much I drank, so I’m to go back tomorrow morning at 730am for a fasting glucose test. Darn. No food from midnight tonight till then. I’m gonna starve! Hopefully though, my test will come back normal (fingers crossed.)

There was an Anglicare opshop right across the hospital, so Grandma said we’d stop by there and see if they were open. I went in and came out with a pink dressing gown-I already have one, but it’s a really heavy fleece one for winter. This one would be suitable to summer-and I’m planning to bring it to the hospital for the birth. It was Aud 12 though, which I thought was rather pricey for an op shop. But I tried it on and really liked it. So.

By the way, Wyld Man wore the white checked men’s shirt in Size 40 which I got at Salvos 2 days ago to work today. He looked really good in it, despite it being one size larger than what he normally wears. I’m happy that my purchases are being put to good use.