Archive | Fashion RSS feed for this section

Three Maternity Summer Tops

31 Jan

It’s been a super hot week. It  was 42 degrees Celsius today, about the same yesterday, but will go down to 33 degrees tomorrow. I’ve been itching to sew, and thought it would be a good time to make some summer tops to go over the burgeorning bump.

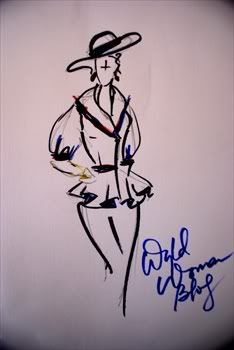
I ran through some designs in my head, and remembered this Vogue Patterns Anna Sui V2850 top which I fell in love with some time ago and decided that it would be perfect converted into a maternity top.

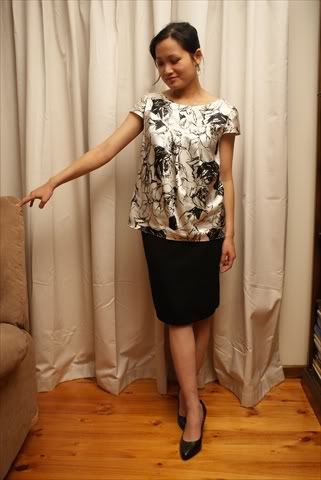
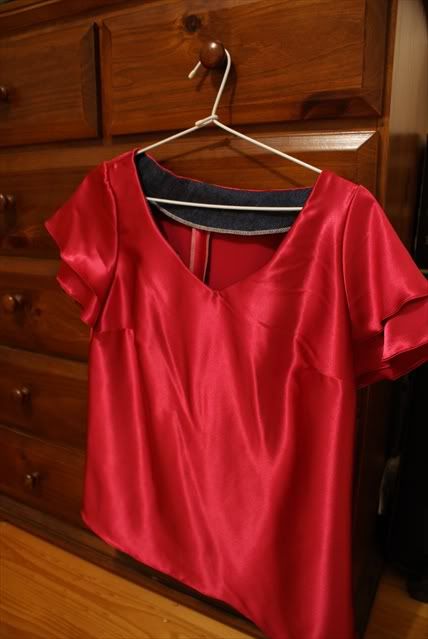
I love the version with the neck flounce. I had a black, loose weave, chiffon-like polyester material in my stash that I bought from Spotlight just for it.

As usual, I drafted my own pattern. Unfortunately, I didn’t take any drafting or construction pictures (it was too hot and I was lazy…) The pattern had to be quick and easy, with lots of room for the baby bump. I didn’t want any darts or closures, so it had to fit over my head easily, but not gape at the neckline. I didn’t really follow the technical stylelines of the Vogue pattern. It was primarily the neck flounce that I wanted to copy.

When I got to work with the fabric, I decided to take it slow, and handsew. It was extremely unstable, stretching everywhere because of its loose weave. The fabric had to be underlined with something, but I didn’t have anything suitable, since the fabric had a bit of stretch. The only thing I had on hand was a red tricot, so I used that. I quite like the effect of the black on the red. The tricot is a bit shiny, but is toned down under the black chiffon, so it looks rather sneakingly snazzy.

It was a good thing I decided to handsew the tricot underlining to the chiffon. It stabilised it, so I was able to eliminate facings on the neckline and armhole. After all the seams were handsewn, I overlocked the edges with a 4-thread overlock. And neck flounce and hemlines are roll hemmed.

This top came together very quickly because there was no darts, no facings, no closures. I’m really pleased with this top. Here’s a couple more views.

I like it with or without the belt. And it looks quite like the Vogue one I think.

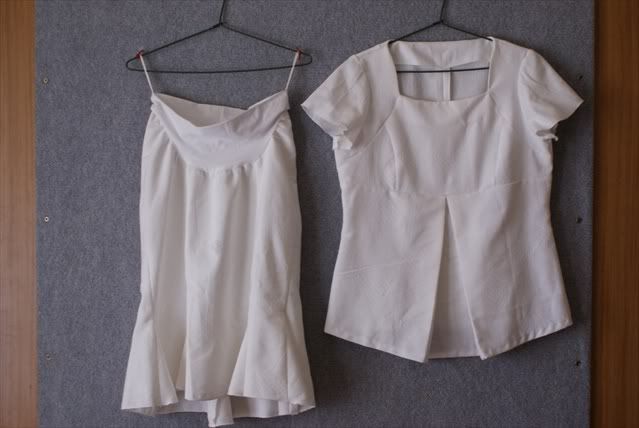
Because this one came so easily together, I decided to use up some other fabric in my stash on this same patter, but with different sleeves. My mum had brought over some nice summery fabrics from Malaysia, and I thought they’d be perfect.

I sketched some designs with the same bodice pattern, but with different sleeves, and decided to cut out two garments at once to save time. I made one with a circular sleeve flounce, and one with a triple cap sleeve.

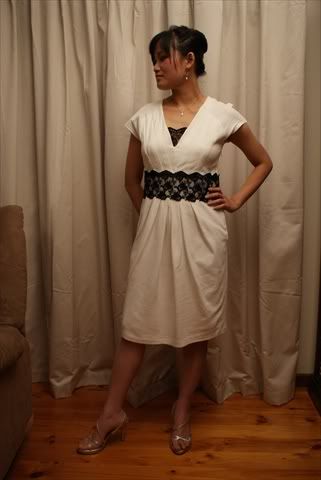
This one is a very light polyester print with a raised texture, similar to a seersucker. I love how the sleeves came out.

The sleeve flounce was roll-hemmed, and the neckline bias-bound.

I used the Banded V-Neck on Woven Fabric technique described in Lynda Maynard’s The Dressmaker’s Handbook of Couture Sewing Techniques. I’ve fallen in love with bias bound finishes. I used to think that it was really hard to cut bias strips out without a rotary cutter and mat, but I actually do them quite well just with scissors. And I also used to think that it was fiddly to bind an opening, compared to sewing in a facing, but I have to say that bias bound finishes are so much neater than a facing, doesn’t flip up, and they just look so good. I’ve been using them on everything lately.

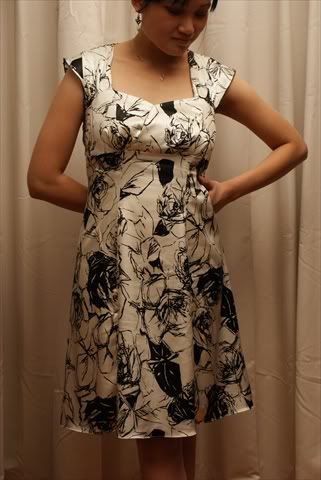
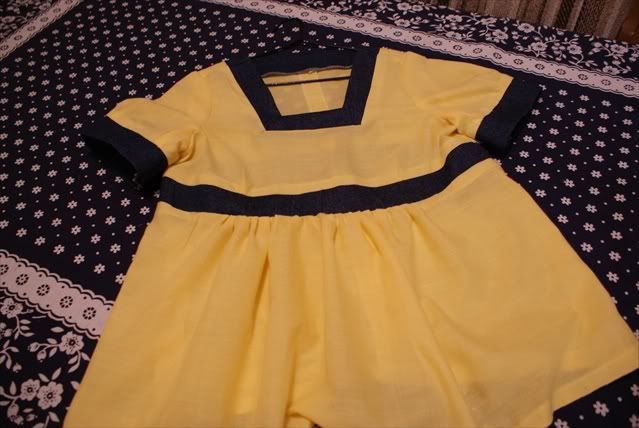
This is the third top I made.

I really like this one too. I’ve been wanting to try out the triple sleeve effect on something. Looks pretty cute. Without the belt, it’s quite casual, but I love both looks. Again, I used self-bias binding on the neckline, and the the lower armhole.

Three tops in a week is my best sewing record to date. I love quick projects! (Ones that turn out all right.)

I’m probably going to make more maternity tops with this pattern, since it’s so easy, and quite the TNT (tried and true) pattern. I’ll just have to think up some different neckline and sleeve treatments to make them all distinctive.

I’m not sure which is my favourite top-Wyld Man can’t decide either. Which one do you like best?

Incidentally, I didn’t finished roll-hemming my black top till after the two others were done. When I did the neck flounce, my overlocker needle broke, and now my overlocker won’t sew properly anymore. Boohoo….I’ll have to send it away for a lookover. Hopefully that won’t take too long and I can get some more tops done soon!

Also, I’m moving blogs soon to www.allthewyldthings.blogspot.com. WordPress is good, but they do restrict Java-based widgets, which I find limiting. Blogger gives you more freedom. I’ll be double-posting here in the mean time while I get the new blog up and moving. It’s not complete yet, but do tell me what you think of the new blog.

Edited on 1/12/2014: I’ve published maternity and nursing patterns on Craftsy! Be sure to check them out!

Black And White Smock/Maternity Top

23 Dec

My, it’s been a while. And 2 days till Christmas! I’ve been busy busy busy-tidying up house, getting rid of unused things, doing some spring cleaning, running after my Little Wyld Man, who isn’t so little anymore. And also, I’m pregnant again! In between getting all of these done, I managed to pull together a simple smock from a Burda magazine, using some left over material from my maternity/nursing cocktail dress.

I was itching to sew something, but was too lazy to draft from scratch, so I decided I must make something quick and simple. I had some Burda magazines from the library and this little number caught my eye.

I love the simple lines, the yoke, and the pleats, which will allow for a growing belly. This is how it was made up in the magazine-in plaid.

I wasn’t too big on it, but I really liked the stylelines, and decided to make it.

This is the pattern sheet. You have to find the correct colour codes for the  pattern which can get confusing. In this case, I’m using the patterns outlined in blue. Burda patterns come without seam allowances, so you have to add them yourself.

I traced out the pattern using some tracing paper, and added a 5/8 of an inch seam allowance. You can use anything see through that is big enough, such as cheap sew-in interfacing, or even freezer paper taped together.

I’ve cut out my pattern pieces. This is a simple pattern, so only 6 pieces altogether.  Should come together pretty quickly. I’ve labelled each piece so that you’ll know what I’m referring to below.

The pattern markings must be marked onto the fabric at this point. I used to use tailor’s tacks, but now I just make a 3/5 inch snip into the seam allowance to mark centre points, pleating points, etc.

I’ve also cut out fusible interfacing for the facing front and back pieces, as well as the yoke. The fusible interfacing I’m using is a tricot knit, which is suitable for most light and medium weight materials. The interfacing serves to stabilise the area, and by this I mean that it will stop the fabric from stretching as you sew and handle it. It also prevents wrinkles and gives a bit more body to the fabric, although you don’t want to use interfacing that is too heavy, as this will change the hand/feel of the fabric undesirably. The interfacing should be cut using the same pattern piece, or slightly smaller.

To fuse, press with an up-down motion on a steam and wool setting till it fuses to the fabric. Wait till cool before moving.

Before stitching anything together, I finish the edges with my overlocker. Or you can use a zigzag stitch with a normal sewing machine.

Here, I’ve stitched the pleats in the front first. My order of construction is always to finish the details on the front garment, piece all front pieces together, then finish back details such as the zipper, and joint the front to the back at the shoulder seams and side seams. The sleeves  and hem are last.

In stitching the pleats, the pattern markings and centre points guide me and I don’t struggle to measure the pleating afterwards. I stitch vertically at each pleat to keep the pleats together, then horizontally across the pleats and the whole neckline.

The front yoke is joined to the main front, matching the centre points in the middle. The seam allowance is pressed upwards at the back.

Here’s I’m stitching the side seams. The shoulder seams are next. When this is done, test for fit. As this was a loose smock, the fit aside from the shoulders, weren’t essential. This top was drafted with a zipper in the back. When I tried it on, I found that it slipped easily over my head and shoulders, so I decided to omit the zipper.

Press the seams open and flat.

Here, I’m stitching the back neck facings together at the centre back seam. Next the back neck facing is joined to the front neck facing at the shoulder seams.

This is what it looks like. Press the seams open and flat. Remember, sew and press as you go.

Join the facing to the main garment at the neck edge, lining shoulder seams on both facing and main garment together. Make sure the centre points of the facing matches the centre point on the main garment. Sew with 5/8 inch seam allowance.

When this is done, turn the facing underneath and this finishes the neckline edge. However, you will find that it flips upwards very inconveniently. To remedy, you’ll need to understitch.

Open up the facing, and use your fingers to press the seam allowance towards the facing. Position your needle so that it is close to the seam line, but not on it, towards the facing. Sew the seam allowances to the facing. This is called understitching. This keeps the facing from flipping up a certain extent. However, you’ll need to clip the seam allowance as per below.

Clip at 1 inch intervals, or less where there is a sharper curve. This releases the fabric and lets it lie flat when you turn the facing under. Be careful to clip close to, but not onto the stitching line.

Next, we finish the hem on the sleeve.

I’m doing a double rolled hem by hand-you can do it by a narrow hemming foot, but I wanted to try this technique instead. Turn the edge wrong sides together around 1/4 inch and sew close to the edge. Using the tailor’s awl helps immensely as the sharp point guides the hem under the presser foot.

Now turn over the second time and do the same. Press the hem flat.

Before sewing the sleeve into the armhole, you have to prepare the sleeve for ‘easing’. The sleeve cap is drafted with extra length, usually about 1-2 cm longer than the armhole. The extra fabric must be eased into the armhole without puckering. This can be a challenge, but with practice comes perfection. To prepare the sleeve, sew a gathering stitch (I use the longest stitch length) inside the seam allowance.

The pattern will have a dot/mark where easing begins. Sew from this point with big stitches. Do not backstitch. Leave a long thread length at each end.

Pull the gathering threads and gather the sleeve cap evenly. The gathers must be ‘gentle’ rather than ‘hard’.

Pin the sleeve cap onto the armhole wtih as many pins as you need. As this is a cap sleeve, and not a full sleeve, find the markings on the armhole where the sleep cap begins and ends. The 1/3 of the lower armhole will be finished with a bias binding. Stitch sleeve to armhole at 5/8 inch seam allowance.

For the bias binding, I cut 1 inch strips on the bias, 16cm in length. These need to be folded in half and pressed. As this is on the bias, it is stretchy and can be shaped into a curve by pressing, as per below.

To attach the binding to the lower armhole, pin the so that the folded edge sits 2.7cm from the armhole edge.

Why 2.7cm? Because it is 5/8 inch plus 1cm. And when you stitch it in 5/8 inch from the armhole edge,and turn the bias binding under, it will match the finished edge of the cap sleeve perfectly. Magic!

Sew 5/8 inch from the edge of the armhole, catching the middle of the bias binding.

Trim aways the ends of the binding, and the seam allowance so that only 1/4 of the bias binding remains.

Turn under and edgestitch close to the edge, making sure the stitching catches and holds the bias binding underneath. Press flat.

Hem the bottom with a double rolled hem.

Finito!

Front view.

Back view.

Closeup of the front.

I’m rather pleased with this top. However, the neckline does gape a bit. So the next time I use this pattern, I’ll do a slight gaposis adjustment. But for now, Merry Christmas everyone!

Edited on 1/12/2014: I’ve published maternity and nursing patterns on Craftsy! Be sure to check them out!

Blackwood Opshops

13 Oct

When I first came to Australia and discovered opshops, somebody told me I had to go to the Blackwood opshops. I didn’t find the time to till last week, when I went to visit some friends there, who babysat the Little Wyld Man while mummy went-a-shopping.

Blackwood, for those unfamiliar to Adelaide, is south of Adelaide, and situated in the hills. It has 5 opshops within a small shopping radius, the best and biggest being the Salvos one. There are also the Save the Children Opshop, Redcross, Goodwill, and the RSPCA thrift shop. See here for addresses.

I went to the Salvos one first, which was the most famous. Inside was the most organized and appealing  layout I’d ever seen in an opshop, being almost boutique-like in a rustic way. That said however, I didn’t find anything  to buy. There was a trouser press being sold for $60 displayed outside, but I don’t iron enough trousers to justify buying it. But if it had been a gravity feed iron/steam generator, that would have been a different story.

The next opshop I went to was the Redcross one. Here I spied an almost brand new shawl-collared white cardigan which I snatched up.

White Cardigan

Originally it had two ties sewn in to tie the front together which I removed. I also tacked the collar in place so that it would stay in that shape instead of collapsing. I’ve worn it out twice within the last week already. $6.99. Kaching!

I also found a dressmaking book, Success with Dress by Ellen and Marietta Resek.

Success with Dress

I hummed and harred about it, but was sold when I saw that it had a section on drafting patterns.

Bodice Drafts

This is an Aussie book, and very well written. Every chapter starts with a cute little rhyme, and it covers most of the basics in dressmaking.  The sleeve draft was good, being an assymetrical sleeve. (Sleeves shouldn’t look the same front and back, the front of the sleeve has less material, and the back has more-some books get it wrong). I have an earlier book by the same authors called Successful Dressmaking, which I posted about here. $3.

I went to Save the Children Opshop next, and here I picked up some fabrics-a nude and a red tricot fabric, perfect for petticoats and lining knit garments. I also found a nice wool felt hat in cream.

Cream Felt Hat

This is a back view.

Back view

I’m not so crazy about the way the grosgrain ribbon trim is finished at the back. I think it needs something more. I haven’t decided what to do about it yet. $4.99

I also found a sewing box for $9. I thought it was a bit steep for an opshop, but I really wanted and needed one, and Spotlight sells them for $20. I’ve been sewing out of a Tupperware container, so I’m glad to have this.

Sewing box

Inside peek

No, it didn’t come with tools and notions. *pout*. Wyld Man says it looks almost exactly like his mother’s.

The last stop was at Goodwill. I didn’t find anything that I liked until I was almost leaving and then I saw this.

Buckram hat with feathers

I really, really liked it. However, the feathers were a little scraggly, and the ribbon wasn’t glued on properly. I bought it, and I’m going to refashion it one of  this  days. This is a hat for spring, while the other one was a wintery one. $6.50.

So that’s all from Blackwood. I didn’t go to the RSPCA one because my friend/tour guide said it wasn’t any good, and I also wanted to get back to Little Wyld Man. I needn’t have worried though, he was very good and didn’t miss me at all!

And while I’m posting about all things opshop, I found this little top at the St Agnes Save the Children Opshop some weeks ago and loved it.

Red Polka Dot Top

Makes me feel like Minnie Mouse! Love it! $3. The camisole came from an opshop too. Can’t remember where from now.

What did you find at the opshops?


Vintage Jocardi Camel Coat Relined

3 Oct

In one of my previous posts, I talked about my expanding vintage winter coat collection. One of my favourites is a vintage camel coat which I found at a Salvos opshop a couple of months ago. It was in beautiful condition, and guessing from the cut it was probably of a 50’s-60’s vintage. The brand was Jocardi, and the only reference I could find online was from  a 1957 book about an Italian who had worked in the Jocardi Coat Factory in Canada.


Vintage Camel Coat


The coat is cut in a very flattering princess style, with topstitching, welt pockets, and a military-looking sleeve head.


Interesting sleevehead


Being interested in patternmaking myself, I was fascinated with the cut  of the sleeve, which is half set-in sleeve, and half whatchacallit. The whole cut of the coat was very feminine. You wouldn’t be able to get anything like it at the shops today. I especially love the way the skirt flares out.

However, the lining was in pitiful state. It was moth-eaten, ripped under the sleeves, threadbare, stained and torn in a few places. And it was a really awful pink typical of that vintage. Not to mention that it smelled something horrible.

But when I tried it on, I fell in love with the way it looked on me-it fitted me exactly, and I didn’t have that colour coat in my collection. The price tag on it was $35-which was a little high for an opshop, and I hesitated when I thought about the lining. But I convinced myself that it could be easily relined. The clincher came when I realised that it had a purple tag and it was half price day for purple tags! My parents were with me at the time and my dad offered to pay for it. So sweet of him. They both said the coat looked beautiful. And you don’t argue with your parents on that one.

So I got back home and sat on it for a week and studied it inside and out. And proceeded to rip the lining out and apart.


Lining front


Lining back


As you can see, the lining has an underlining made of cotton flannel, and the back has  a rectangle of suede sewn onto it. I took pictures of how the lining inside was constructed and attached and made notes so as to guide me  later. My plan was to rip one side of the  lining  apart at the seams, and leave the other side intact, then use the lining  pieces as a pattern for the new lining.


Lining pattern pieces


The lining pieces had to be ironed flat first. And I had to measure the seam allowance on it to determine how much to sew on the new lining.

I was set on a really funky lining, and had in mind some loud polyester fabric leftover from a maternity dress, which I got from  the bargain table at Spotlight.


Print maternity dress (See the Wyld Maternity Collection 2009 here)


To underline it, I used some tan wool crepe in my stash (which again came from an opshop). It wasn’t an attractive colour, and had some holes in it, but being an underlining, it didn’t matter too much.  I but both lining and underlining using the old lining pattern pieces.


New lining pieces


I made sure to mark the darks on both fabrics, then sewed the outline of the darts through both fabric layers.


Dart outline


I also sewed around the edges of all the lining and underlining pieces together, treating them both as a single layer from then on. For the back panels however, I joined the centre back seam of both fabrics together, but before sewing the edges of both fabrics, I sewed the suede rectangle onto the underlining. Then I sewed the edges of the lining and underlining together, treating it as a single layer from  then on. I then proceed to join all the pieces together, as well as attaching the sleeves.

Now comes  the big part-joining the lining to the coat. I sewed the lining edge to the coat facing, right sides together, all around from the middle of the collar down one side, and then down the other. This ensures that you don’t end up with one side of the lining longer or shorter than the other. It also means that the middle of the collar of the lining and the coat will match up. Now all that is needed is the hemming of sleeve and hem.

The sleeves were 1 1/2 inches too short-so I lengthened it. Luckily the hem inside was quite generous which allowed me to do that. Otherwise it would have looked a bit funny on me. I had cut the sleeve lining longer to accomodate  that alteration.

And this is the finished product.


New lining


Front view


Inside view


With the leftovers of the print lining, I made a square scarf to match (edges finished with a rolled hem on the overlocker) and a hair scrunchy.

I sent the coat to be drycleaned before I wore it. And I have worn it many many times over the last two months. I love this coat, and especially the lining. I feel like I’ve got a wonderful secret hidden under a demure coat. The loud print sings to me and to anyone I’ve shown it to.

Take note  however that if you remove the labels from the old lining to insert the care instructions for the coat into the new lining, because the dry cleaners might make you sign a waiver/indemnity in case of possible damage due to there being no care label.
This was a quick project and very satisfying. And it’s not that hard to do. So next time you see a beautiful coat with an old lining, rescue it and give it an internal facelift.

Burda 6/09 Sunburst Pleat Front Dress

24 Sep

I first read about Burda magazines in some sewing blog and was fascinated by the concept of a fashion magazine with real patterns. Since then I always kept a lookout for it at newsagents-not all stock them. Borders carried them till recently. I ‘ve been hunting for back issues to read and found that the Payneham library carried them-so I bacame a member (despite already being able to borrow from 5 libraries.)

For those unfamiliar with it, Burda is a monthly German dress pattern magazine that has over 40 patterns in it which you can trace out and make. I don’t usually buy it-to date I’ve  only bought three issues. It’s about $15.90 per mag and is good value for money if you make at least one garment from  it every month. It has pictures of models wearing the designs, a page with line drawings, and an insert of patterns in various colours  which you trace out. I like looking at the line drawings more than the pictures for the design ideas it inspires me to.

Of the 6 mags I borrowed, the June 09  issue had an interesting dress.

Burda 06/10

Pleat front jersey dress 102 Burda Jun 09

101 Burda 06/09 Pleat Front Dress

This is a clearer line drawing of it.

102 Line Drawing

I love the sunburst pleats and the pretty folds on the front. I formed an idea of a white dress with a black lace belt in this design and couldn’t wait to  get to  it.

This is the instruction sheet in the magazine.

Instruction sheet

This is the pattern sheet. Each sheet is labelled alphabetically with patterns pieces printed on it. One sheet may have several garment patterns on it, and the patterns for different garments are  differentiated with a different colour.

Pattern sheet

I trace out my pattern with sew-in interfacing, which is see-through and cheap. The Burda patterns do not have seam allowances added on to it, so here I am tracing around the patterns with a tracing tool-

Double pencils with a 5/8-inch spacer

-which I got at Lincraft.

I traced a size 38 all over, but I was actually a size 42 at the waist, and 40 at the hips. I was too lazy to grade up or  down according the markings-it was hard  to see and too tedious. I figured that since this is a stretch fabric, I’ll just pin fit the sides later. Also, the patterns were drafted for an “average” person-but who is? I’m very short waisted, so you’ll see in my pattern pieces below I’ve made a length adjustment by shortening  it by 2cms.

Pattern pieces cut and altered.

There are no construction photos-it was very quick to put together. The whole thing was sewn on my overlocker. The only thing that took some time was the  front pleats.

The instructions said to baste the pleats together, and sew it onto the front lining piece and treat as one, and not to press the pleats. I was too lazy to baste and just sewed the pleats on permanently and pressed it anyway. But the effect aren’t the soft folds as  in the picture, which I do regret not following.

The instructions for the dress was for a zipper to be installed in the back. However, instead of cutting 2 back pieces, I cut it on the fold, so I decided to put an invisible zipper in the side seam.

One thing I found was  that despite choosing the size 38, the whole dress was  huge on me. I had to remove 2 inches on each side seam from top to  bottom.

This is my finished dress.

Sunburst Pleated Dress

Back view

The lace belt is removable and this is what it looks like without it.

Dress plain.

I wanted to be able to wear it casually, as well as to more dressy functions.

It didn’t look so when the model wore it, but the neckline plunged too low for me. So I made a removable lace modesty panel.

Removable lace modesty panel

Here is a closeup of the lace belt, which is almost the favourite part of the dress for me. I wanted it to look like galoon lace, which I couldn’t find at Spotlight, so I made do with what I had in my stash.

Lace belt

The belt was the hardest to do, as this is the first time I’ve dealt with lace in this context. This was actually a small fat quarter piece of lace that was given to me with one scalloped border. I decided to cut it down along a motif, baste it to a white sew-in interfacing (to show off the black lace), and then backed again with black knit fusible interfacing. The edges have been finished with an overcasting stitch through all three layers.

Here is a parting shot.

Front view

I really, REALLY like this dress, especially with the lace belt. Which one do you prefer?

A Vintage Rabbit Fur

16 Sep

I’ve recently amassed a collection of  vintage coats. Living in a temperate climate, I feel quite justified in doing so. Coats are such necessities in winter. Everything that you wear next to your body remains unseen save for your coat. A beautiful coat and a pair of beautiful boots are absolutely indispensable for a lady. And because that’s what most people will see of you in winter, that’s all the excuse a lady needs to have more than just one.

A recent audit brings my coat count to 6 coats-all vintage or preloved save one, which came from Malaysia, bought before I first moved here. My most recent acquisition came from the Adelaide Vintage Fair last week. I found this beautiful vintage rabbit fur coat on a rack and tried it on…and loved it!

Vintage Rabbit Fur

The previous owner told me it belonged to her mother-in-law and was made in the 50s, but despite that it is in beautiful condition inside and out. The fur doesn’t even need to be dry-cleaned-it smells beautifully fresh. The lining has no tears or holes in it, and it fits perfectly. It’s very hard to get real fur nowadays, and they are up in the thousands of dollars. I kept stroking it and tried it on and Wyld Man said I should get it. So I did. I felt so glamorous when I tried it on. But it’s such a pity the whether is warming up now and I won’t have an excuse to put it on!

Here’s a back view.

Back view

When I first touched it I could feel the difference between it and an acrylic fur-it’s beautifully silky and warms you up immediately when it’s on. And real fur almost always has piecing because you don’t really get large hides from small animals. So this really was the genuine article.

I also came across a genuine Louis Vuiton bag in good condition for $50, but decided against getting it. There was a lady across the table who had been ignoring the bag, but started looking at it when I picked it up, and the minute I put it down, she snatched it up and bought it. I think she might have been afraid that I would pick it up again. I don’t know if carrying a monogrammed portmanteau is really my style, even if I could have gotten a good bargain, so it wasn’t a great loss for me.

The North Adelaide Vintage Fair is held fortnightly on the second and fourth Sunday each month from 9am to 4pm at the Estonion House on Jeffcott St, North Adelaide.  Lot’s of interesting things there to see and buy.

White Nursing Cocktail Dress

17 Aug

Some time ago I went to Munno Para Spotlight with a friend and picked up a lovely fabric for 6 dollars a metre. It was a polyester spandex fabric with an off white background with sketchy black roses. I fell in love with the fabric and decided to make a dress with it for a wedding that I was to attend-which was last weekend. I wanted to make a cocktail dress, but had to think long and hard about what design would suit the fabric, keeping in mind that I also wanted to be able to breastfeed in it.  I decided to make a dress of this design.

Nursing Cocktail dress

The dress was to have an empire waist, princess seams, a crossover front with gathers, within which there was to be a hidden opening for nursing access.

Because this was a woven material with a tiny bit of stretch, but I wanted a form fitting dress, I decided it would be a good time to take my Gladwrap pattern and use that to make the pattern of this dress.

Gladwrap pattern

I traced around onto a new sheet of paper and cleaned up the lines. I made two test garments before I was satisfied with it. This was the finished pattern.

Gladwrap sloper

I discovered that I have a swayback, and forward shoulder. A swayback is when a person’s back curves inward more than usual, requiring a deeper dart in the back waist.

I wanted a dress that was fully lined, with a combined arm and neck facing. Here are my pattern pieces and fabric all cut out.

Pattern and fabric pieces

Above you can see the facing pieces has already been interfaced-I block fused the interfacing to the fabric before cutting it out. I used a fusible warp-knit interfacing which was really light, had some stretch, and was almost plush on the non-fusible side. It was perfect for this fabric-I also tried it on a twill and a crepe and it still draped beautifully without changing the hand of the fabric.

Warp-knt interfacing

I also interfaced the front bust crossover pieces, as it needed some structure and stabilizing for the nursing access. I marked the bust point on the piece and slashed it to 3 cm above and then overlocked the slash-like this.

Nursing access

I was also careful to mark all the important points with either notches or tailors tacks. The blue thread you see above marked the triple folds on the bust piece. The folds were done in such a way that it hid the nursing access in a pleat-see below.

Front shoulder and bust panels joined

Here I’ve made the folds in the shoulder piece and joined it to the bust panel. These need to be joined to the back shoulder panels. Then I stitch all the princess seams in the front and back but do not join them to the top panels yet as I need to stitch in the neck facing and lining first.

Front princess seams

Bust and shoulder panels

Next I work on the facing and lining pieces, joining them all together except at the side seams.

Facing and lining pieces

Here the join at the  neckline facing and lining get a little tricky. If you look closely, I made a slit in the center top on the front lining, thinking that it would be necessary to accomodate the crossover at the bust. I found later that the slit wasn’t necessary at all.

Next I joined the neckline facing to the front bust panels.

Joining the front to the facing

I graded the seam allowance to reduce bulk, then turned and understitched the facing and seam allowances together. After this, I sewed the bust panels to the princess panels, and then all the side seams.

I marked the nursing slit length on the lining and opened it up.

Nursing access in the lining

Here I inserted an invisible zipper, sandwiching the zipper between the right sides of the lining and the shell, and handbasting first. I don’t think its the correct way to insert an invisible zipper into a garment with the lining, as the zipper can get caught in the lining. I had to redo the zipper twice before I was satisfied with it. Next time I’ll set the lining away fron the zipper.

I had left the armhole edges on both the lining and the shell raw, so I did a rolled hem on the armhole  shell with black thread. I overlocked the lining armhole, and used the overlocker to cut away 1cm all around the armhole so that the lining wouldn’t show.

I did a rolled hem with a narrow hemmer on my machine for the hem. For the lining hem, I overlocked the edges to trim away any longerbits, and then I sewed some lace for a couture touch. I love that only I know that it’s there.

Lace on the lining hem

And finally….

Here’s a back view.

It looks a bit rumpled because it just travelled to Melbourne and back again. I wore it almost the whole day at my friend’s wedding.

Here’s a view of the nursing access.

Hidden nursing access.

The dress was an amazing fit. Using the Gladwrap to make a personal sloper is a fantastic idea. No need to keep making fitting changes or multiple test garments. I highly recommend making one.

Here’s a final picture of me at Claudia and Kaiwin’s wedding.

Silvia, Manchee, Claudia, me, and Chok Fung

Edited on 1/12/2014: I’ve published maternity and nursing patterns on Craftsy! Be sure to check them out!

Yellow Nursing Top

28 Jul

A few months ago I bought some yellow jersey material from an op shop. It was a very pretty yellow, just my colour. I make it a policy to snap up knit fabrics if I see them in opshops as knits are quite pricey compared to wovens. I wasn’t sure what I wanted to do with it then, but a few days ago I thought that I should start drafting patterns for knits. And I’ve been wanting a top for nursing-ones that have discreet access for breastfeeding. I came up with this design.

Design idea

It was to have an empire waistline, a wrap front with bust gathers, and a modesty panel behind with cutouts for nursing (see dotted line and gray shaded area). At first I wanted to make puffed cap sleeves  as in the picture, but when I made my pattern, I forgot and just make short set in sleeves.

I drafted the pattern from scratch using Winifred Aldrich’s close fitting jersey bodice block.

It's the one on the far left

I chose the option with greater ease (Aldrich gives you instructions for close fitting with maximum stretch, and another with more ease for less flexible material).

My personal jersey clost fit block with sleeve

I took some pictures of the drafting and pattern manipulating processes- but stopped halfway because the pictures weren’t that good. Here are some of them.

The back and the modesty panel for the front

This is the wrap front-I'm correcting the gape by slashing the neckline and pivoting it

That’s all I have of the drafting. I WILL take more organised pictures in the future…

Anyways,  that was a few days ago and I didn’t get to put the whole thing together till today. This is how it looks like.

Front view

Back view

That’s an awful lot of wrinkles. Methinks I have to do a narrow back adjustment, a swayback adjustment, and a forward shoulder adjustment. Or maybe it’s the way I’m standing.

Closeup

Below you’ll see how it functions as a nursing top.

Discreet nursing access

Instead of pulling the top up for feeding, this top provides full coverage.

I’m really happy with the way this top turned out-it looks completely store bought. It’s not my first time sewing a knit top, but it was the most successful. This was because I used  tricot knit interfacing strips to stabilise the necklines and armholes to keep them from stretching out of shape.

If anybody is interested, I can draft a custom nursing top pattern based on this or make you one. Just email me.

Quick Pencil Skirt

16 Jul

On Monday I bought a 2-metre piece of twill fabric at the opshop for 2 dollars. I knew that it was perfect winter skirt material. I planned to make a Vogue inspired skirt out of it, and after cutting it out, I found that I still had enough left for another skirt. This post will be about that skirt which I knocked up on the fly yesterday.

I wanted a quick pencil skirt with a slit-no zippers or closures-something with a stretch waistband that I can wear whether pregnant or not. I had some black stretch fabric lying around that I had bought from some opshop in some distant past, and some grey lining material that I was given. I quickly measured my waist and my hips-33″ and 38″. It is depressing to realise  that I’ll never be a 24″ again.

My plan was to just measure and cut on the cloth without any pattern. I wanted a rectangle of black stretch fabric about 3/4 of my waist measurement for the waistband, about 6 inches high and doubled over for strength and stability as per diagram below.

The blueprint

The waistband would go from my natural waist to my hipline, and the twill fabric panels will start from the hip. That way I needn’t add darts for the lower panels, since it would fit over the widest part of my hips without any closures. The lower panels are cut simply-my hips were 36+2 inches wearing ease=38″, so the front panel was 19″ wide with half inch seam allowances, and the back panels 9.5″ with seam allowances. The front and back panels taper downwards to 17inches and 8.5 inches in width respectively. The back panels I added about 1.5 inches in width starting from the middle centre back line for a split.

The cut pieces

I also cut a lining from the above twill fabric pieces.

Cutting into the lining

See Ma! No pins! I was really doing this on the fly. I was more excited about this skirt than the Vogue inspired one now-even though that one is all cut out.

First thing was to overlock all the edges.Most sewing machines have an overcasting stitch if you don’t have an overlocker, although if you do plan on sewing garments, you can’t beat an overlocker for a professional finish. I love mine.

To make the waistband, join the shortest edges of the two pieces together and form a tube. Use a narrow zigzag stitch, or overlock.

Form a tube with the stretch fabric

Fold the tube in half lengthwise, so that you have a double layer going all around your waist.

Waistband doubled up

The back slit needs to be done first. I neglected to take pictures-but here’s a walkthrough. Sew down the back seam as usual, but at the start of the outside corner, change the stitches to the largest straight stitch. Press open, and sew around the slit. Use a seam ripper and unpick the large stitchs up to the outside corner where the slit starts.

Now it’s just the simple matter of joining the two side seams together.

Repeat the whole process with the lining.

Attach the skirt to the waistband-pin at quarterly intervals, and stretch the waistband to fit the skirt as you sew. Use a narrow zigzag stitch. Now attach the lining with the same process, just be sure that the right side of the lining faces the inside. Use a blindhem stitch to hem the skirt and the lining, making sure that the lining is hemmed higher so that you don’t see the lining from the outside. Handsew the lining slit to the skirt slit.

Quick pencil skirt

Back view

Hmm..I didn’t do a very good job on the pressing. But I guess it’s not wool, since it didn’t shrink when I steamed it, and it’s not wrinkle resistant.

Closeup view

All in all, I’m very pleased with this skirt. It was a very quick job, and I spent only a dollar on the material. It will always fit me, and the pencil skirt is very flattering. It is also great for maternity wear too!

Go home and make one today!

Opshop Finds On My Birthday

13 Jul

Yesterday I turned 26. It doesn’t feel like another year has passed and that I’m a year older and only four more years away from the big three-O. In my head I still feel like a giddy 18-year-old. We had a quiet celebration with the family on Sunday night. The Wednesday before, Wyld Man and I had a special night out to celebrate both our birthdays-we’re both July babies. I got a Mileni bag as a present from the family, as well as a gift card at Suzannegrae.

Mileni bag

It’s a huge bag-I carried it around yesterday with one of the compartments with my stuff, and the other half with William’s stuff-nappy, squirt bottle, a bottle of water, nappy change mat, bib, hanky and a stuffed toy!

Anyways, yesterday morning I caught up with a playgroup mummy and she brought me to her favourite opshop! It’s run by the Uniting Church and is quite small, but I still managed to bag quite a haul. I got a few things for myself…

Opshop outfit

The tan crossover top was AUD1.75,  and the angora wool skirt was AUD3.  I especially love the skirt, with is a thick stretchy knit, quite warm and perfect for winter outfits. The only thing is that with tights, it tends to ride up unless I make a lining for it, which I shall.

I also got myself a couple of belts for 50cents each-I keep wearing mine out.

I got William a few things-lots of bibs and some little outfits like…

Marks and Spencer red striped 2 set

…for AUD3. And a couple of Wondersuits…

Wondersuits

…for a dollar each.

I also picked up 2 metres of a lovely winter weight wool twill.

Twill fabric

I’m in the middle of cutting it out for a skirt. I’ve decided to make another Vogue 8426-inspired skirt.

When I came home later that day, I had this given to me.

My Little Wyld Man's card for me

He’d even signed it!

Signed by William

Isn’t it the cutest little scribble ever?

And this was his and daddy’s present to me.

365 Day Cookbook

A friend on Facebook reminded me of how blessed I was to have my very own knight and prince.*Sigh*. Happy.